This blog tells the story of how I created a catchy image for use with my web site (background and elsewhere). From an idea to a branch of ideas, to a simple python script. It’s not a proper tech tutorial but it describes all the steps and provides the working code. Hope that you’ll find it usefull, both the idea and the code.
When you run a business centered around data and web services, your website’s visuals shouldn’t look and feel like stock art. They must deliver the message: “Yes, this is data, precise, technical work. There’s also a part that hints: “This can be fun. It’s more than just moving a bunch of 1’s and 0’s back and forth.”
The question wasn’t what to communicate but how. The background is the quiet element on the page, yet it sets the tone. You notice it most when it’s not right.
Starting Point
Core idea was to create an image that visually represents data going through some kind of transformation.
The first thought was straightforward: Just screenshot a hex dump of some random file. Visually it’s easy to associate with files, data, conversion. Techie was part almost done at this point. The designer part just didn’t like this solution though. It was too rigid. There was no flexibility, with content, shapes, directions, or colors.
I can use Adobe Photoshop or Gimp to create or edit an image but it’s not very fast, and requires patience and good amount of labor. It’s not easily repeatable. Having to repeat the same process almost from scratch just to make a small design change (such as spacing between columns, number of characters before direction change, or using different range of colors) is exhausting. Not good.
Adobe Illustrator can streamline transitions and apply presets but still requires too much manual work.
Enter Python Pillow
A while back I workied on some python exercises from a tutorial by Corey Schaefer. It used python Pillow library to manipulate images. This intrigued me as a possiblity and quickly established itself as a leading option. It would be ideal solution if I could entirely code an image in python. Even better – I can ask AI to code a good portion for me from a text prompt, and from there add a function to randomize hsl color, move column starting point a few pixels, shift direction for a few degrees, or add extra spacing. Tweak the code with a few keystrokes. No need to even touch the mouse.
All work done in about one hour. Repeatable. Product editable with any image editor for pixel-level control. Maybe you can sense my excitement over this. Simple solutions are my favorites.
Designing the Visual Concept
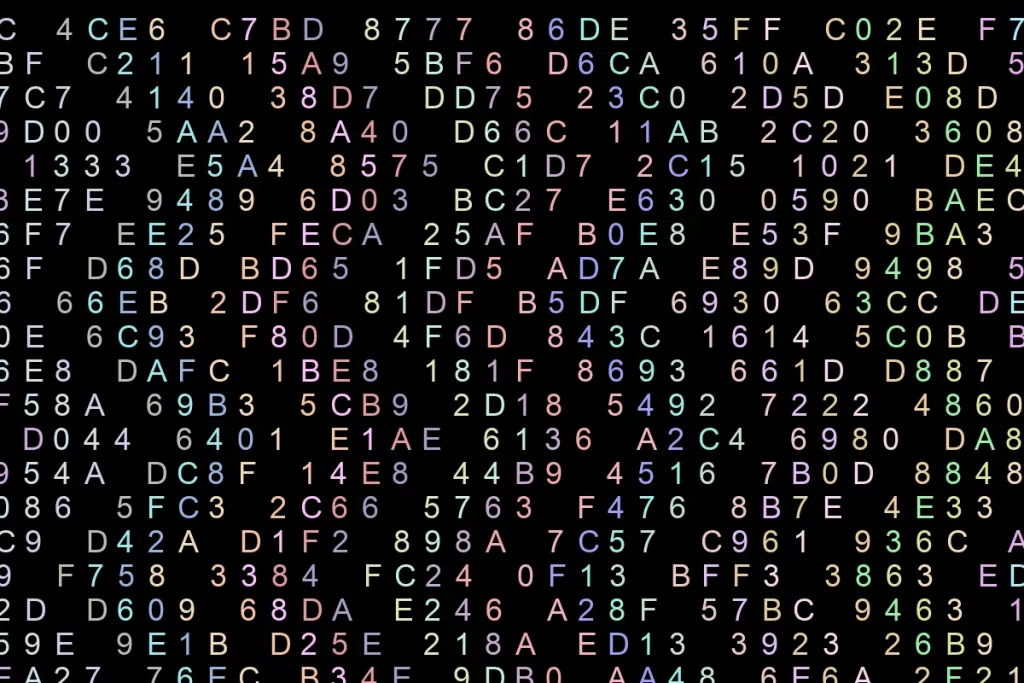
The goal was a 1200×800 pixel canvas on a dark background, filled with hexadecimal characters — the digits 0–9 and letters A–F — arranged in vertical columns with a subtle zig-zag rhythm rather than rigid straight lines.
Why hex? Binary as a representation of nearly everything in digital computing was my first choice. However it’s just too bland for my taste. I admire designers who strive toward minimalism and create incredible products with sparse resources. I’m just not one of them. With limited time that I assigned for this project I figured that hexadecimal numbers was a choice with more options.
Why zig-zag? Straight columns would look static. The slight wave gives the image angles, movement, and energy, and — if you’re the kind of person who likes meaning baked into design decisions — it neatly mirrors the idea of ETL pipelines: data flowing in, being transformed through multiple stages, and arriving to its destination. Each differently colored column represents a separate input, stream, process, and a separate story.
The color palette was deliberately kept bright against the dark background — vivid but not garish, varied but not chaotic.
How the Code Works
The script uses Python’s Pillow library (PIL) to create the image and draw text onto it character by character. Here’s the high-level approach:
- A precise grid of positions is calculated based on font size and spacing.
- For each position, a random hex character is selected from the string
"ABCDEF0123456789". - Each vertical column gets its own randomly assigned color, kept consistent down the full height of the image.
- Every fifth column is skipped entirely, creating 4-letter grouping, and also visual breathing room between the zig-zag lines.
- A small horizontal offset is added to each row — reversing direction every few rows — to produce the zig-zag effect.
- Using HSL is my favorite way to define colors because it’s reasonably easy (with little practice) to set or read any given color value or a range. (see notes below)
- WebP image format results in smaller file size and faster loading. Every kilobyte counts. WebP offers excellent compression with minimal quality loss—like ZIP files shrinking folders without losing data.
The result is the image you see below: a dense but readable field of glowing hex characters, each column marching its own color down the canvas with just enough wobble to feel alive.
import math
import random
from random import randint
from PIL import Image, ImageDraw, ImageFont

last_clr_idx = 0 # reference to the last used color index from the list
dxr_colors = [(255, 160, 122), (219, 112, 147), (255, 165, 0), (240, 230, 140), (255, 228, 181), (230, 230, 250), (216, 191, 216), (123, 104, 238), (127, 255, 0), (0, 250, 154), (102, 205, 170), (143, 188, 139), (0, 255, 255), (64, 224, 208), (0, 191, 255), (255, 235, 205), (188, 143, 143), (210, 105, 30)]

# limited range of semi-random lighter rgb colors for use on dark background
def rnd_rgb_clr():
    return (randint(150,255), randint(150, 255), randint(150, 255))

def rnd_sel_clr():
    global last_clr_idx
    last_clr_idx = last_clr_idx + 1 if last_clr_idx < len(dxr_colors) else 0
    return dxr_colors[last_clr_idx]

# create proper semi-random hsl color string (all hues, lighter colors range)
def rnd_hsl_clr():
    hue = math.floor(random.random() * 360 * 100) * .01
    sat = randint(60, 100)
    lum = randint(60, 100)
    return f"hsl({hue},{sat}%,{lum}%)"

# HSK
width = 1200 # image width in pixels
height = 800 # image height in pixels
font_size = 36

dist = font_size + 4 # distance between two characters
h_dist = math.floor(dist * .9) # horizontal distance between characters
v_dist = math.floor(dist) # vertical distance
txt_str = "ABCDEF0123456789" # allowed characters: hex digits only
img_font = ImageFont.truetype('Garuda.ttf', size=font_size)
# fill_clr = rnd_rgb_clr() # optional random fill color

img = Image.new("RGB", (width, height), color="#17181c")
img_draw = ImageDraw.Draw(img)
make_angles = True # angled rather than straight lines
trig = 0 # item count trigger
sign = 1 # direction
col_uniq_clrs = True # make each column use random color
col_idx = 0 # column index - needed for identifying each column for coloring
col_colrs = [(190,190,210)] # column colors; must have index 0 pre-populated since column indexes start at 1 (enumeration)

for y2, y in enumerate(range(0, height -5, v_dist)):
    for x2, x in enumerate(range(-150, width, h_dist)):
        # first time around determine color for each column ... unless using dxr_colors
        if y2 == 0:
            col_colrs.append(rnd_rgb_clr())
        # skip every n-th column
        if x2 % 5 == 0:
            continue
        r_char = txt_str[randint(0, len(txt_str) - 1)]
        # adjust starting point for each row for angled look
        row_incr = trig * 35
        img_draw.text((x + row_incr, y), r_char, font=img_font, fill=col_colrs[x2] if col_uniq_clrs else rnd_rgb_clr())
    trig = trig + 1 if sign == 1 else trig - 1
    if trig >= 4 or trig < 1:
        sign = -1 * sign

img.show()
# img.save('output.webp', 'webp', lossless=True)
# img.save('output.webp', 'webp', quality=70)
# img.save('output.jpg', quality=70)
Alternatives
An experienced designer will likely find even better ways of producing an image of similar or even better design quality within similar time constraints. However, if circumstances should require, people with even limited programing experience should be able to create graphics containing combination of colorful text and basic shapes, precisely positioned on canvas. You can also do it for fun as a python programing project to create a wallpaper for your device.
Digging deeper into Pillow library will reveal many useful options such as enhancing color, contrast, brightness, and sharpness, filtering, transforms, tagging, etc. For applying such changes to large number of files Pillow library is a really good choice.
Hope you find this article usefull, and the idea applicable and time-saving for your future projects.
Notes
HSL color code is a way to define colors (in css, svg, misc. apps) using three components: Hue, Saturation, and Lightness.
Hue (full circle from 0° to 360°): Represents the color type (e.g. red at 0°, green at 120°, blue at 240°).
Saturation (range 0% to 100%): Defines color intensity — 0% is grayscale, 100% is fully saturated.
Lightness (range 0% to 100%): Controls brightness — 0% is black, 50% is normal, 100% is white.
example: hsl(160, 50%, 60%)
Links
- Corey has a number of awesome python tutorials from basics to 11-part series about FastAPI.
- Excellent beginner+ list of python tutorials at Socratica
- Python Pillow library
Credits
- In preparing this series of blogs as well as in coding I used to various degrees help from Claude, ChatGPT, and Perplexity AI LLMs.
- Authors of python Pillow library for such a great product